Reels are Instagram’s top-performing content format, offering the highest reach and engagement rates compared to other post types. This makes them a key content format for creators, brands, and everyday users alike. In fact, Reels generate twice the average impression rate, making them a powerful tool for growing your audience.
One major reason why Reels go viral is because of their use of music and sound. From wanting to tell a story, entertain your audience, to promote a product, the right audio can make your content stand out. Adding music or sound effects helps set the mood, boosts engagement, and increases the chances of your video being discovered through Instagram’s algorithm.
In this guide, we’ll show you exactly how to add audio to Reels using Instagram’s built-in music, adding your voice, or uploading original sounds.
Why adding audio to Instagram Reels matters
Adding audio to Instagram Reels is a key ingredient for creating engaging and high-performing content. With the ability to use trending music or your own voice, sound helps capture attention, tell stories, and boost visibility. Here are some of the reasons creators should consider adding audio to their Reels:
1. Audio grabs attention instantly
When users scroll through Instagram, audio is often the first thing that grabs their attention. Whether it’s a catchy song, a funny sound, or a clear voiceover, sound makes your Reel more engaging. If you add audio to Instagram Reels, you’re more likely to stop users from scrolling past. This gives your content a better chance to be watched all the way through, which can boost its reach and performance.
2. Audio helps set the mood
Every video tells a story, and music helps bring that story to life. The right background music can make your Reels feel happy, emotional, energetic, or dramatic. When you add music to your Reels, it helps your audience connect with your message faster. This emotional connection keeps viewers engaged and makes your content more memorable and shareable.
3. Reels with audio perform better
Instagram favors Reels that get strong engagement, and audio plays a big part in that. When you add audio to Instagram Reels, especially trending sounds, your content is more likely to appear in Explore or Reels tabs. Using popular or relevant audio helps your Reel get discovered by more people, increasing likes, comments, shares, and followers.
4. Adding original audio builds your unique brand voice
Using your own voice or custom sounds gives your content a personal touch. When you add original audio to Reels, it helps your followers recognize your style. This can be a short message, a tutorial, or a funny reaction. Original audio makes your content stand out and is a great way to show your personality or build trust with your audience.
5. Audio encourages viewers to interact
Great audio doesn’t just entertain, it invites viewers to join in. If you add music to your Reels that others enjoy, they might use the same sound in their own content. Instagram even shows who created the original audio, giving you more visibility. This makes your Reel a potential trend starter and can help you grow faster.
6. Sound adds a professional feel
Even if your video is simple, the right audio can make it feel polished and professional. Background music, clear voiceovers, or smooth sound effects all help improve the viewer’s experience. When you consistently add audio to Reels, your content looks more refined and engaging, which builds credibility with your audience and encourages them to keep coming back.
How to add audio to Reels on Instagram
Instagram gives you several easy options to add audio to your Reels. You can use popular music, your own voice, or a sound you’ve saved from another Reel.
These multiple options means creators are never shy of how they can be creative with sounds on their IG Reels. Below are four simple methods you can use to add audio that fits your content perfectly.
1. Use Instagram’s built-in music library
Instagram’s music library is a popular and convenient way to add audio to Reels. You can search for a song by name, artist, or keyword. Creators can also preview the track, select the exact part of the song they want, and add it to their video. This is a great option if you want to add music to your Reels quickly and professionally.
To use the Instagram built-in music library, follow these steps:
- Open the Instagram app.
- Tap the “+” icon or swipe right to open the Instagram camera.

- Select “Reels” from the options at the bottom of your screen.
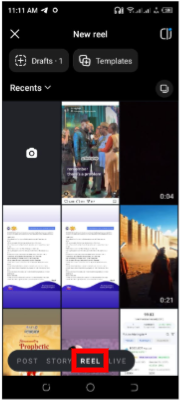
- Create your Reel by recording clips or uploading videos within Instagram’s Reel editor.
- Tap the music icon at the top of the screen.
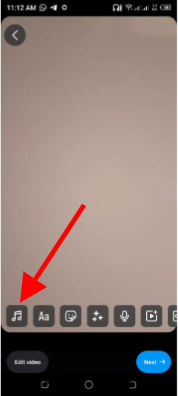
- Browse Instagram’s music library to find songs or original audio.
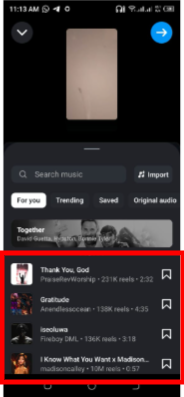
- Choose your song, then drag the slider to select the specific part of the track you want to use.
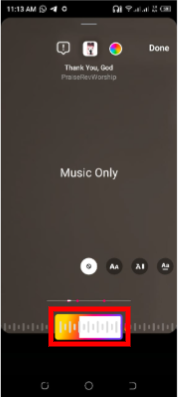
- Tap “Done” once you’re happy with the audio selection.
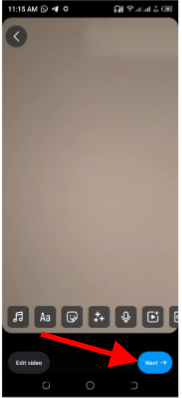
- Finish editing your Reel by adding filters, text, or effects.
- Tap “Next”, then add a caption.
- Choose or edit your cover slide.
- Tag people or add locations.
- Finally, click on “Share” to publish your Reel!
The above steps will quickly add audio from the sound library to your Reels in no time. If you don’t know the music or sound to use, you can explore the “For You” or “Trending” tabs to find music that’s currently popular. You can also search by genre or mood to match your content style.
2. Use your own voice (Voiceover)
If you prefer to use your own voice or create unique sound content, you can add original audio to Reels by simply recording with your phone’s microphone. This is ideal for tutorials, behind-the-scenes clips, storytelling, or sharing personal messages. Just speak or make sounds as you record your video, and Instagram will automatically label it as your original audio.
- Open the Instagram app and go to the Reels section.
- Record or upload your video clips as usual.
- After recording, tap the preview button to go to the editing screen.
- On the editing screen, tap the microphone icon at the top or side of your screen.
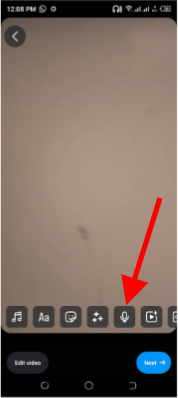
- You’ll see a timeline of your Reel.
- Tap and hold the record button to start speaking over your video. You can record voiceovers for specific parts or the entire clip.
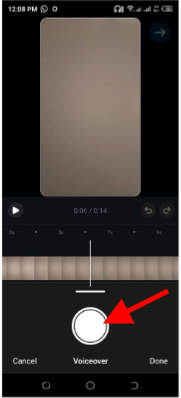
- When you’re done, tap Done to save the voiceover.

- Add any final edits (text, filters, stickers), then tap Next.
- Add a caption, cover, tags and then hit Share to post your Reel!
If you are recording a voiceover, make sure to record in a quiet environment so your voice is clear. Good audio quality helps you connect with your audience and makes your Reel feel more personal and authentic.
3. Import audio from a video
You can also add audio to Instagram Reels by uploading a pre-recorded video that already has sound. When you do this, Instagram will automatically extract the audio and apply it to your Reel. This method is perfect if you’ve edited a video using another app or added a voiceover elsewhere.
- Open the Instagram app and go to the Reels section.
- Tap the gallery icon (bottom-left corner) to access your camera roll.
- Record your original Reel video or upload a prerecorded one.
- Next, hit the music icon and click on ‘Add sound from video.’
- This will open your camera roll and you can select the video file that has the audio you want to use.
- Instagram will automatically import the audio from that video.
- After importing, continue editing your Reel as usual.
- You can also tap the music note icon to mix in other sounds or adjust volume levels.
- Once you’re happy with the edit, tap Next to write a caption, choose a cover, and share your Reel.
This is especially useful for creators who use tools like CapCut, InShot, or Adobe Premiere to add music or effects before uploading to Instagram.
4. Use saved or favorited audio
If you come across a Reel with audio you like, you can tap the audio name at the bottom of the screen and then hit Save. When you’re ready to create your own Reel, tap the Saved section under the audio menu to access your favorites.
- Open Instagram and go to the Reels camera.
- Tap the music icon at the top of the screen.
- Select the Saved tab to view all your saved audio clips.
- Tap the audio you want to use and choose the section of the track.
- Continue recording or uploading your video, then finish editing your Reel.
- Tap Next, add your caption, cover, and tags, then hit Share.
This makes it easy to reuse trending sounds or music you want to try later. Reusing popular or familiar audio helps your Reel feel timely and may boost its chances of being seen by more people.
How to mix voiceover with Instagram music in Reels
While you can add sounds in multiple ways, Instagram allows you to combine your voice with background music in a Reel. Instagram makes it easy to mix voiceovers and songs from its music library, so you can narrate while keeping your content lively and engaging.
Follow these steps to create a perfect audio blend:
- Open Instagram and go to the Reels camera.
- Record or upload your video clips as usual.
- Tap the Audio (music note icon) at the top of the screen.
- Choose a song from Instagram’s music library.
- Select the part of the track you want to use.
- Tap Done once the song is added.
- Next, tap the Microphone icon to record your voiceover.
- You’ll see the Reel timeline. Tap and hold the record button to add your narration or voiceover.
- Tap Done when finished.
- Now, tap the Mixer icon or Audio Controls at the top of the screen.
- You’ll see three volume sliders:
- Camera Audio (original sound from your video)
- Music (Instagram song)
- Voiceover
- Adjust each volume to blend your voice and music the way you like. For example:
- Lower music volume slightly so your voice is clear.
- Keep both volumes balanced for a polished, professional sound.
- When you’re happy with the mix, tap Done, finish your edits, and tap Next.
- Add your caption, edit the cover, and hit Share.
With this, you are able to combine sounds in your Reels giving you that professional appeal. It’s always best to listen to your Reel before posting to make sure the voiceover isn’t drowned out by the background music. Use headphones for more accurate sound editing.
Tips for choosing the right audio
Choosing the right audio can make a big difference in how your Instagram Reel is received. Whether you want to add music or voiceover to your Reels, the sound you choose should match your message and grab your audience’s attention.
Here are some smart tips to help you pick the best audio every time you create:
1. Match audio to your Reels
Before you add audio to Instagram Reels, think about the tone of your video. Is it fun, emotional, dramatic, or educational? Choosing music that matches the mood helps your message land better with viewers. A funny clip pairs well with upbeat or silly music, while a slow song works for heartfelt moments. The right mood helps people connect and keeps them watching longer.
2. Use trending songs to boost visibility
One of the easiest ways to increase reach is to add music to your Reels that’s currently trending. Trending audio often gets pushed by Instagram’s algorithm, helping your Reel show up in more feeds. You can find trending sounds in the “For You” section of the Instagram music library or by browsing popular Reels. Just make sure the trend fits your content naturally.
3. Always preview the track
Don’t just pick a song because it’s popular, listen to the track first. Make sure it sounds clear, fits the pace of your Reel, and doesn’t have distracting parts. Some songs may start off great but become too loud or chaotic halfway through. Previewing helps you avoid last-minute edits and ensures you get the best audio section for your content.
4. Choose audio that won’t compete with your voiceover
If you’re planning to add voiceover to your Reels, your background music should be soft or subtle. Loud or fast-paced music can make it hard for viewers to hear what you’re saying. Use the audio mixer to lower the music volume and keep your voice clear. The goal is for the two audio tracks to work together, not fight for attention.
5. Always save great audio
When you come across a Reel with a sound you love, tap and save the audio for later. This makes it easy to find the right track when you’re ready to post. Reusing saved audio saves time and keeps your content fresh with popular sounds. It’s also great for planning and batch-creating content in advance.
6. Use original audio to build your brand
When you add original audio to Reels, like your voice, jokes, or unique sound bites, it helps create a personal style that viewers can recognize. This makes your content stand out in a sea of similar videos. Plus, if others start using your audio, Instagram will show your name on it, giving you more visibility and credibility.
In the end
Audio is one of the most powerful tools you can use to make your Instagram Reels more engaging, memorable, and shareable. Whether you choose to add music to your Reels using trending songs or add original audio to Reels with your voice, sound plays a big role in capturing attention and connecting with your audience. It helps set the mood, boost visibility, and even build your personal brand.


