


Nearly everyone is always looking to enhance their content on Instagram and one way you can do this is by using Instagram filters. These simple yet effective tool sets can instantly enhance your photos and videos, making them more eye-catching and engaging.
From a casual user to a content creator and even businesses, learning how to use filters on Instagram can take your posts to the next level. Filters allow you to adjust the mood, lighting, and overall style of your content, helping it stand out in the crowded Instagram feed.

With so many options available, from subtle enhancements to bold transformations, applying filters to Instagram posts has become an essential skill for anyone looking to make an impact on the platform. In this guide, we’ll show you how to use Instagram filters effectively to make your content shine.
What are Instagram filters?
Instagram filters are built-in editing effects that you can apply to your photos or videos directly within the Instagram app. These filters automatically adjust colors, brightness, contrast, and other visual elements to enhance your content with just a few taps. Filters can give your content a consistent style or mood without needing advanced photo editing skills.
Instagram comes with a number of preset effects you can apply to your static images before posting them on your Instagram feed. Popular examples include Clarendon, Juno, and Lark. Each one subtly or dramatically changes the image’s appearance, often improving lighting, tone, or color vibrancy.
Additionally, instagram also has AR (Augmented Reality) filters which use facial recognition and augmented reality to add interactive elements to your Instagram Stories and Reels. These can include makeup effects, face animations, objects that move with your head, or full-scene enhancements.
How filters can transform your content
Instagram filters do more than just add a splash of color, they can completely change how your content looks and feels. If you want your photos to pop, your videos to feel cinematic, or your Stories to stand out, the right filter can make a huge impact.
Here’s how filters can elevate your content:
1. Set the mood
Filters help establish a tone, warm filters create a cozy vibe, while cool tones give a calm, modern feel. You can match your visuals to your message without needing complex editing tools.
2. Create a consistent aesthetic
Using the same filter or similar styles helps build a recognizable visual brand. This is especially useful for influencers, creators, and businesses looking to create a cohesive Instagram grid.
3. Enhance quality instantly
With just one tap, filters can brighten underexposed photos, sharpen details, or boost dull colors, making your content look polished and professional even if it was taken on a phone.
4. Boost engagement
Eye-catching visuals stand out more in crowded feeds. Well-edited, aesthetically pleasing posts often get more likes, comments, and shares because they grab attention quickly.
5. Encourage creativity
Especially with AR filters, you can add effects like floating animations, surreal backgrounds, or interactive elements that make your content fun and memorable.
How to use Instagram filters on your posts
Instagram’s built-in filters help you create different moods and styles for your photos with just a few taps. Here’s how to apply them when uploading a post:
- Open the Instagram app on your phone and log in.

- Tap the plus (+) icon located at the top or bottom of the screen.

- Select the “Post” option from the available choices.

- Either take a new photo or choose one from your gallery.
- Tap “Next” in the upper right corner to proceed to the editing screen.

- Ensure you’re on the “Filter” tab at the bottom.
- Scroll through Instagram’s 24 filter options to find one that suits your image.

-
- Double-tap any filter to reveal a slider that lets you fine-tune its intensity.
- Once you’re satisfied with the look, tap “Next” again.

- Add finishing touches:
- Write a caption
- Tag people or add a location
- Optionally, include music
- Hit “Share” in the top right corner to publish your photo to your feed.
Using filters effectively helps your post stand out and maintains a consistent aesthetic across your profile.
How to use Instagram’s AR filters (Effects)
Augmented Reality filters on Instagram are interactive effects that use your phone’s camera and facial recognition to add digital elements to your real-world images and videos. Unlike standard photo filters, AR filters move and respond to your gestures or facial expressions.
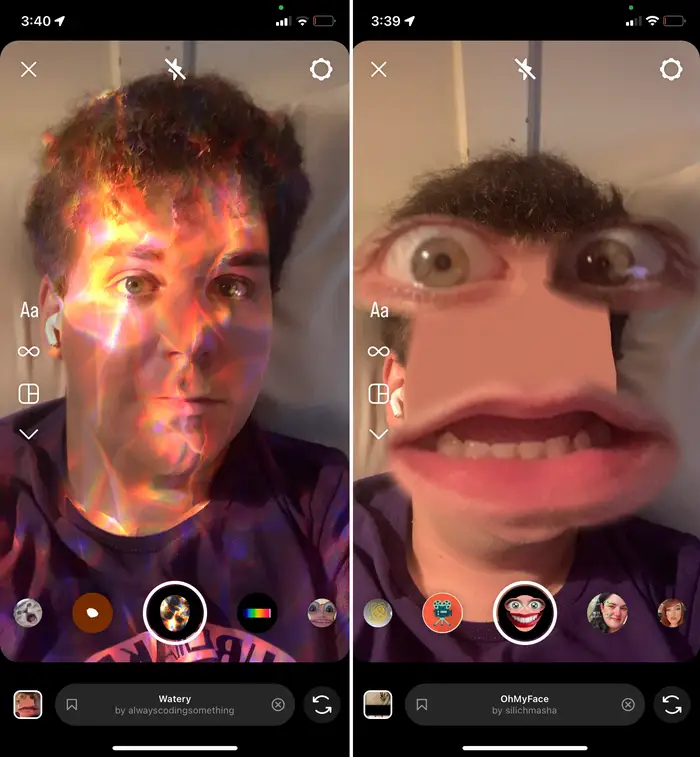
Instagram offers a wide range of effects from virtual makeup to immersive AR backgrounds that let you get creative with your content. Here’s a simple guide to using these effects in your Instagram Stories, Reels, or Live videos:
- Open the Instagram app and log into your account.
- Swipe left from your home screen to access the camera.
- Choose your content type at the bottom of the screen:
- Story
- Reel
- Live
- Near the shutter button (the white circle), you’ll see a horizontal row of effect icons.
- Swipe through the icons until you reach the “Browse effects” option (represented by a magnifying glass) and tap it.
Once inside the Effects Gallery:
- Explore effects organized into categories like:
- Trending
- Appearance
- Aesthetic
- Games
- Humor
- Special Effects
- Use the search tool (top-right magnifying glass) if you’re looking for a specific effect by name.
- To save an effect for later, tap the bookmark icon on the effect preview.
- Access your saved effects by selecting the bookmark icon next to the search bar.
After picking your desired effect:
- Swipe down to close the gallery.
- Start capturing your content: snap a photo, record your video, or begin your Live session.
How to use Instagram filters without posting
You can try out Instagram filters and even save photos or videos with them without ever posting to your feed or Stories. This is great if you want to experiment with filters, capture content for later, or just enjoy using the effects privately.
Here’s how to apply filters to your pictures and videos without posting:
- Open the Instagram app on your phone.
- Swipe left from the home screen to open the camera (same as if you’re posting a Story).
- At the bottom, choose “Story”, “Reel”, or “Live”, depending on the type of content you want to test.
- Browse and apply a filter by swiping through the effects next to the shutter button or tap the “Browse effects” icon (magnifying glass) to find more.
- Capture a photo or video using the shutter button once the filter is applied.
- After capturing, Tap the three dots icon in the top right corner of the screen. From the drop-down menu, select “Save” to save it to your device.
- Tap the back arrow and then “Discard” or “Delete” to exit without posting.
Your filtered content is now saved to your camera roll, and nothing was posted to Instagram. This is a handy way to pre-create content, test how filters look in different lighting, or simply take cool pictures for personal use with no public sharing required.
How to find Instagram filters using the filter search feature
Instagram makes it easy to discover new and trending filters through its built-in search tool. Whether you’re looking for aesthetic effects, face-altering filters, or just something fun for Stories and Reels, the Filter Search feature helps you find exactly what you need.
- Open the Instagram app on your mobile device.
- From your home screen, swipe left to open the camera.
- At the bottom, select either “Story,” “Reel,” or “Live.”
- Next to the shutter button, swipe right through the effect icons until you see a magnifying glass icon labeled “Browse Effects.” Tap on it.

- The Effect Gallery will open, showing you popular filters and different categories.
- To search for a specific filter:

-
- Tap the magnifying glass icon at the top-right corner of the screen.
- Type in keywords (e.g., “vintage,” “glow,” “sparkle,” “face zoom”) to browse relevant results.

- Once you find a filter you like:
- Tap it to preview.
- Tap “Try It” to use immediately, or tap the bookmark icon to save it for later.
Saved filters will appear alongside your default ones when you open the camera again. This search feature helps you explore thousands of user-created and official Instagram filters quickly.
How to save Instagram filters for future use
Instagram lets you save filters so you can easily access them whenever you create content. This way, you don’t need to search again. The best part? You can save multiple filters to build your own personalized library of go-to effects for different moods, themes, or content types.
Saving your favorite effects is quick and simple with these steps:
- Open the Instagram app and swipe left to access the camera.
- Swipe through the effect icons near the shutter button to explore filters, or tap the magnifying glass icon to browse effects.
- When you find a filter you like, tap on it to open its preview.
- Tap the bookmark icon (🔖) on the bottom left or top corner of the screen.
- This saves the filter to your camera for future use.
To access your saved filter collection, open the Instagram app and swipe left to access the camera, your saved filters will appear in the scrollable effect tray, right next to the default ones. Alternatively, saved filters can also be viewed in the “Saved” tab within the Effects Gallery.
5 Tips for using filters to enhance your Instagram content
Using filters the right way can take your Instagram posts from average to eye-catching. Here are five smart tips to help you get the most out of Instagram filters and elevate the look and feel of your content:
1. Stick to a signature filter style
Using the same filter (or a consistent group of filters) helps create a cohesive look across your posts. This builds a recognizable aesthetic that makes your profile visually appealing and on-brand.
2. Don’t overdo it
Less is more. A filter should enhance your content, not overwhelm it. Stick to subtle adjustments that improve color, lighting, or mood while keeping the image or video looking natural.
3. Use AR filters to add personality
Augmented reality (AR) filters let you add playful or dramatic effects to your Stories and Reels. Use them to express your mood, highlight reactions, or make your content more interactive.
4. Match filters to your content type
Different filters work better for different types of content. For instance, use bright, clean filters for product photos. You can also go for warm, soft tones in personal or lifestyle posts. Bold or cinematic filters are suitable for travel or creative content.
5. Test before posting
Always preview how a filter looks in different lighting or angles. You can test filters in the Instagram camera without posting by saving the content to your gallery for viewing. If it looks good, then you can proceed to posting. If it’s the other way round, you can make necessary adjustments till you get a suitable result.
On a final note
Instagram filters do more than just add visual effects to your content, they can make your content stand out in a crowded feed. If you wish to enhance the mood, create a consistent aesthetic, or simply grab attention with your content, the right filter can elevate your photos and videos instantly.
While there are dozens of filters, creators can experiment with different filters, test out AR effects, explore trending styles, and save the ones that suit their brand or personal vibe. With a little creativity and consistency, filters can help you craft a feed that’s both engaging and unforgettable.